


So…your little one has his/her birthday coming up. They know what kind of party they want, what they want to do, what kind of character cake they want, what party favors they’ll give out, etc… It’s all planned out — down to the very detail.
So yesterday my daughter turned five years old. If you are like us, our little one had been planning her birthday for LITERALLY 9 months… Every.single.day she was talking about what she wanted. Like most preschool girls, our daughter decided she wanted everything Frozen. (Surprise, surprise, right?) And of course that included an Elsa character cake.
We always look at cakes when we go to the grocery store (cheap entertainment) and sure enough there is always a Frozen cake or cupcakes in the display. Well, her birthday came around and I went to go pick up her cake while she was at preschool. And lo and behold, there was no Frozen cake to be had. REALLY?! How can there not be any Frozen cakes in stock?
I know should have ordered a cake ahead of time. But with Easter, sick kiddos, a teething infant, and well….life, it just slipped my mind. Plus I (wrongly) assumed that I could waltz into the store and buy a pre-decorated Frozen cake.
So, partly out of laziness and partly out of dread of going somewhere else and taking two kids under the age of two in and out of the car, in the cold drizzle (yet again) after a long string of errands that morning…. I decided to let my resourcefulness kick in and make due with what I had. So I got creative and decided to make my own character cake.
So here’s an easy way for you to create your own DIY character cake.
What You’ll Need:
- A cake of any sort (pre-made, homemade, cookie cake, ice cream cake, etc)
- Frosting
- Icing bag + tips
- Picture of your chosen character on cardboard
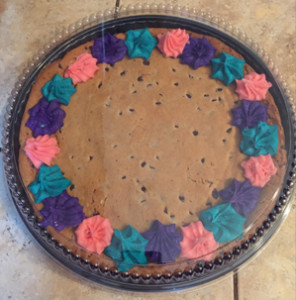
1. Prepare or buy your cake.
Normally I make my own cakes, but this year I decided to go with the no-fail cookie cake.
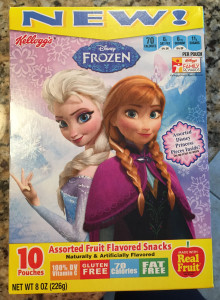
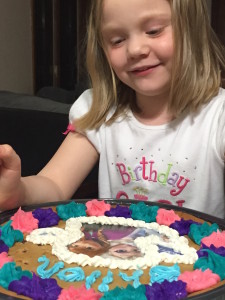
2. Get your character image. Make sure it will fit the size of your cake.
I used a Frozen fruit snacks box and cut out the Anna and Elsa images. You can also use the plate from your party supplies! If you print out a color image computer paper, make sure to glue it on cardboard, as the icing and butter from the cake will bleed through the paper.
3. Position your image on the cake.
4. Use your frosting to make a border around the image and secure it to the cake.
I use something like this to make textured frosting. If you don’t have a frosting bag, you can put the frosting in a ziplock bag and cut a small hole in one of the corners to act like a frosting bag. It works like a charm!
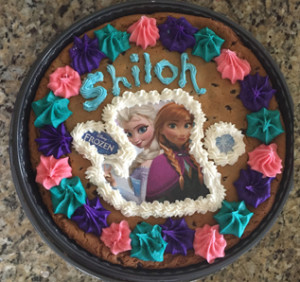
5. Viola!
You have a super easy character cake that takes no time and your kiddo will love. (My daughter couldn’t believe her mom “made” the Elsa and Anna on her cake and thought it was pretty cool that I used the fruit snacks box for it! #momwin)
What other ways have you used what you had in the kitchen to creatively solve a dilemna? Let me know below!


Pingback: 5 Ways to Embrace Your Child's Current Obsession - Intentional Living for Intentional Moms()